Thursday, September 30, 2010

Digital Temperature Meter using PIC16F688

A digital temperature meter based on PIC16F688 microchip and DS1820 temperature sensor that displays temperature on Celsius and Fahrenheit scales.


Very cool project, firmware written in mikroC compiler.


Read

40x7 Running Message Display using PIC Microcontroller

LED matrix message displays are really cool. Here is one based on PIC microcontroller that displays time, calendar, temperatures, and, text messages. It can store for up to 10 messages, each 250 characters long, and supports both static and running messages. Message selection can be done through an IR remote control. The brain of this device is a PIC18F252 microcontroller and uses 16-bit serial-in-parallel-out shift registers to drive the LED columns. It operates with 12-24 V DC power supply.


Read

Monday, September 27, 2010

Serial LCD Driver using 74HC595 Shift Register

HD44780 based character LCD displays are very popular among hobbyists. They are easy to interface with microcontrollers and most of the present day high-level compilers have in-built routines for them. However, the bad part is at least 6 I/O pins of microcontroller are required to use them in your project. Therefore, they are not applicable for 8-pin devices like PIC12F series microchips. The aim of this project is to allow LCD interfacing to such devices using 3-wires. I am going to demonstrate this with PIC12F683 microcontroller. The character data or command from the microcontroller will be transferred serially to an 8-bit serial-in parallel-out shift register (74HC595), and the parallel output will be fed to the LCD driver pins.


Saturday, September 25, 2010

Frequency Counter Using PIC12F683

The Timer1 module inside PIC12F683 is a 16-bit timer/counter. If used as an asynchronous counter, this module can be used for counting the frequency of an external clock source applied to its GP5/T1CKI port. The following example is a 0-65535 Hz frequency counter using Timer1 module of PIC12F683. The Timer1 module is reset first and then turned ON for 1 sec to count the clock pulses arrived at its T1CKI port during that period. The number of pulses arrived in  second is frequency itself. The measured frequency value is sent to PC through serial port and displayed on a hyperterminal receiver window. If the external clock frequency is over 65535 Hz, Timer1 overflows and an interrupt is generated. In case of the overflow, "Frequency out of range " message is displayed on the window. A 555 Timer IC running as an astable multivibrator is used as the external clock source.


Monday, September 20, 2010

Gas Sensor Using PIC16F84A

Here's a gas sensor circuit based on PIC16F84A and GH-312 sensor. GH-312 is able to sense gases like smoke, liquefied gas, butane and propane, Methane, alcohol, hydrogen, etc. Once it senses any of these gases, it triggers the microcontroller, which in turn switches on a buzzer and flash a LED.

Monday, September 13, 2010

PIC16F628A Mains Frequency Counter

This project reads the AC line frequency and displays on a LCD. The 120V AC is first converted to 12V AC using a step-down transformer. With the help of a BJT, the output Sine wave is further converted to 5V square pulses which is fed to TOCKI pin of PIC16F628A. The Timer0 module is used as an 8-bit counter. The counter counts the number of pulses arrived at TOCKI port in 1 sec, which, in fact, is frequency of manis AC, and displays it on a LCD.


Read rest of the project.

Monday, September 6, 2010

Capacitance Meter: PIC16F88 + mikroC

If you don't have a capacitance measurement on your multimeter, here's one that you can make by yourself. This capacitance meter is based on capacitor charging time. PIC16F88 is used to measure the voltage rise across the capacitor and finds the time required to get the known voltage across it. Then it does some math and finds the capacitance value.

 Source: http://www.pic_examples.byethost3.com/capacitance_meter.html
The firmware is written in mikroC. Read rest of the project.

Friday, September 3, 2010

Serial ISP Programmer for ATMEL AT89SXX

What is the first thing that you need when you first step in to the world of microcontrollers? Yes, it is a programmer. ATMEL's AT89S series microcontrollers are popular among hobbyists and designers. This projects describes about a simple serial programmer for AT89SXX microcontrollers.

Source: http://www.8052.com/users/AT89S52InSystemProg/

 The programming software that is available for free provides the following features:


  # Device Supported - AT89S51, AT89S52, AT89S8252, AT89S8253.
  # Read and write  Intel Hex files.
  # Chip Erase.
  # Verify.
  # Lock.
  # Read Device Signature.
  # Advanced Device Specific Functions.

Wednesday, September 1, 2010

PIC Microchip Data Logger

This projects uses a single chip, PIC12F683 microcontroller, for temperature logging. A DS1820 sensor sends temperature value in digital format to PIC12F683 and it stores the value in to its internal EEPROM. The sampling interval for log can be selected from 1 sec, 1min, and 10 min using three tact switches.


The recorded temperature measurements can be downloaded to a PC through a serial interface. Read rest of the project.

Tuesday, August 31, 2010

Talking Clock

This is a very cool project. This digital clock speaks time in your voice. You have to first store audio samples in a SD card and the time is tracked by DS1307 RTC chip. The microcontroller used is Parallex Propeller running at 80MHz.


Popcorn Walkthrough from Gadget Gangster on Vimeo.


For functional details and others, visit link.

LCD Clock based on ATtiny2313

This LCD clock is based on ATtiny2313 microcontroller and displays time in 24 hour HH:MM:SS format. The accuracy is about +1 sec in 48 hours, and provides three tact switches for time setting.


For schematic and software, Visit Here.

Monday, August 30, 2010

Three Channel IR Remote Control based on PIC Microchip

This project is a 3-channel IR remote control for relays. It uses RC5 IR protocols.
Features :

* CPU PIC12F629 at 4MHz crystal for Tx/Rx
* 3 channel output relay
* The Tx use sleep mode for saving battery power
* Use Phillips RC5 protocal
* distance more than 7 m.
* Easy circuit to build and assembly

 Source: http://www.sixca.com/eng/articles/remote/index.html

On both the sides (Tx and Rx), it uses PIC12F629 microchips. For firmware and receiver part, visit here.

Sunday, August 29, 2010

Control Your Home Appliances using a DVD Remote Control

Are you looking for a device that can be used to control various household appliances (like fan, rice cooker, lights, etc) using your TV or DVD remote control? If yes, this is the project you are looking for. This is based on Atmega8 microcontroller. The microcontroller gets control commands from a DVD remote through IR link. Each time an appliance is turned ON/OFF, its status is stored in the internal EEPROM location so that it can be accessed later in case of power failure.


Source : http://arif-ece.blogspot.com/2010/07/remote-controlled-home-appliances_10.html

The firmware is written in AVR GCC. Read the full project.

Saturday, August 28, 2010

PIC Based Temperature Data Logger

Here's a PIC based temperature data logger. The PIC used is 8-pin PIC12F683 and the temperature sensor used is DS1820 that doesn't require calibration and provides temperature value in digital format. This temperature logger records data inside the internal EEPROM. Each temperature value is 8 byte, so the resolution is 1 degree C.


Besides, the sampling interval is user selectable (1 sec, 1 min, or 10 min). The recorded values can be sent to a PC through a serial port.

Thursday, August 5, 2010

AT89C52 Based Contact-less Tachometer

Tachometer is a device that counts the revolutions per minute (RPM) of a rotating shaft. This projects describes how to make one that requires no contact with the rotating shaft. The microcontroller used is AT89C51 from Atmel, and the RPM value is displayed on a character LCD.

An IR Tx/Rx pair is used as a proximity sensor. The counted pluses will come from the proximity sensor, when it will detect any reflective element passing infront of it, and thus, will give an output pulse for each and every rotation of the shaft, as show in the picture below.


 For circuit diagram and programming, read rest of the project.

Wednesday, August 4, 2010

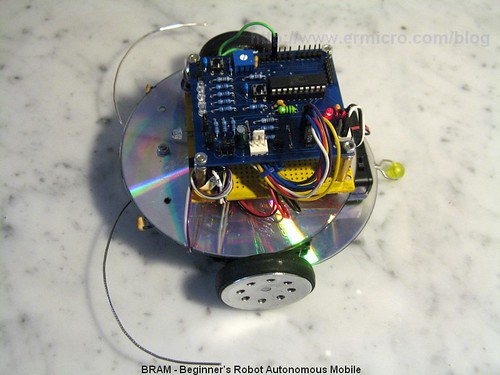
PIC-based Beginner’s Robot Autonomous Mobile (BRAM)

This tutorial shows how to build a Beginner’s Robot Autonomous Mobile, BRAM. It is designed to be easily built using some of the parts that you could easily found at home. The main controller for this robot is Microchip PIC16F690.


Source: http://www.ermicro.com/blog/?p=983

Two old CDs are used to build the chasis for the robot. The lower deck is use to hold the geared DC motor, battery power, caster and the robot’s bumper switches (whiskers) while the upper deck hold the robot’s motor driver, sensor’s board and the PIC16F690 circuit board.


The following are the list of BRAM’s construction material parts:
  • Two CD/DVDs for the chassis
  • Two geared DC motor rated 4.5 to 5 volt with the wheel or you could use the modified servo motor (it’s a servo motor without the electronics’s control board)
  • One 3 x 1.5 volt AA battery holder with on-off switch
  • One plastic bead (usually it use for the neck less) and one paper clip for the caster
  • Two microswitches and two paper clips for the whisker or bumpers sensor (not shown on the above picture).
  • Nuts, bolts, PCB (printed circuit board) holders, double tape to hold all of these parts together.
 Demo Video

Friday, July 30, 2010

Versatile Central Heating Program Controller using PIC16F628A

This central heating program controller is designed to use with a heating boiler. The two relays control the supply of hot water and heating. It has a front panel switch control with a 16x2 LCD screen. It also provides a serial interface that allows to be operated remotely from a PC.

The programmer and boiler control relays are contained in separate units so that the relays can be located close to the boiler while the programmer itself can be located anywhere in the house using low voltage connections back to the relay unit. Besides you can also make a serial interface connection local to the programmer in which case you only need 4 wires for power and relay controls.
Source: http://picprojects.org.uk/projects/chc/chwkg.jpg
Features

* Independent control for heating and hot water.
* 10 flexible program entries.
* Programs can be set to operate Mon-Fri / Sat-Sun / Mon-Sun.
* Manual advance for water and heating
* Water and heating can be independently set to manual or programmed control.
* Operation and setup from front panel or remote serial CLI
* Battery backup for Real Time Clock (RTC), program settings and manual control.
* Programmer can be located remotely from boiler using low voltage signals over CAT5 or 6-core alarm cable.
* RS232 serial interface with command line interface allows full control and setting from any computer.
* Front panel control can be locked-out from serial CLI
* Based on Microchip PIC 16F628A microcontroller


Tuesday, July 27, 2010

Interface a SD Memory Card to ATmega8 with FAT32 Implementation

Some applications of microcontrollers like data loggers require a bulk of data storage and the internal EEPROM memory may not be sufficient. In such cases, use of SD memory card is a much cheaper solution.


This project demonstrates how to interface a SD card to ATmega8 microcontroller and transfer data (both in raw and FAT32 format) between the two. The data read from the SD card are transferred to a PC through RS232 connection and displayed on a Hyper-terminal window. Similarly, to write data to card, the data was fed through HyperTerminal, by typing some text.

For firmware and other details: SD/SDHC Card Interfacing with ATmega8

Monday, July 26, 2010

Ultrasonic Parking Aid

Parking your vehicle in a narrow space is always a risk. This parking aid project from Cornell university students will help you to prevent your Mercedes from getting scratched while parking in a tight space. This ultrasonic ParKontroller can sense how far you are away from the wall or a hidden object behind your car and warn you visually and audibly using LEDs and speaker respectively.

The students use the principles of Sound Navigation and Ranging (SONAR) technique in this design. This principle is used for finding the distance and direction of a remote object underwater by transmitting sound waves and detecting reflections from it. First, a series of short ultrasonic pulses are transmitted using a transducer that changes voltage into sound waves.

Source: http://instruct1.cit.cornell.edu/courses/ee476/FinalProjects/s2007/jjl49_mar97/jjl49_mar97/index_files/image022.jpg

This parking aid device can detect an object within a range of 40cm with accuracy of 1cm in the distance interval of 15 to 40cm. For more details, visit: Ultrasonic Parking Aid.

Thursday, July 22, 2010

LCD Thermometer using Atmega8 and LM35.

Atmega8 is a popular 8-bit microcontroller from ATMEL. It has 8KB self-programming Flash Program Memory, 1KB SRAM, 512 Byte EEPROM, 6 or 8 Channel 10-bit A/D-converter. Up to 16 MIPS throughput at 16 Mhz. 2.7 - 5.5 Volt operation. The LM35 of National Semiconductors that is used in this project is a precision centigrade temperature sensor, which has an analog output voltage. It has a range of -55ºC to +150ºC and a accuracy of ±0.5ºC . The output voltage is 10mV/ºC . The output voltage is converted by the AD convertor of the AT Mega8. The temperature is displayed on an LCD module.


For circuits and software, CLICK HERE.

ATtiny 2313 Development Board

ATtiny2313 is a successor of the 1200 and is designed to address the requirements of battery operated and portable applications by offering low power consumption and a high level of system integration in a small package. Here is a development board for the beginners.For PCB and Programming software, Click HERE.

Sunday, July 11, 2010

Make your own Variable DC Power Supply

A variable DC power supply is the most useful tool on a hobbyist's workbench, because different electronics projects sometime require different DC supply. National semiconductor's LM350 IC can provide a variable DC voltage ranging from 1.25 to 33V with the use of just two external resistors. It can provide current up to 3.0A if properly heat-sinked.

This project uses a LM350 IC to generate a variable DC voltage from 1.25-18V. My finished product looks like this.

For more details about this project, visit this.

Saturday, July 10, 2010

Interface 16x2 LCD to a PIC microcontroller using C

Liquid crystal displays (LCDs) are more convenient ways of displaying output results in any microcontroller based projects. If you are new to microcontroller interfacing, and want to learn how to interface a LCD to a PIC microcontroller you need to look at this. Here you will find PIC16F628A interfacing with a 16x2 LCD display and the programming is done in mikroC.

The objective of this experiment is to interface a 16x2 LCD to PIC16F628A in 4-bit mode. This means the data transfer will use only four pins of the microcontroller. There is no additional hardware setup needed for this experiment, as we have a ready-made LCD interface female ......
Click here for more details.

PIC12F683 Development Board

If you have never tried PIC microcontrollers, you can start with Microchip's 8-pin PICs. One of the most versatile type is PIC12F683. It is a 8-pin Flash based, 8bit RISC microcontroller from Microchip. This little PIC microcontroller offers up to 6 I/O pins (the remaining two are power supply pins). It needs no external oscillator, as it has an in-built oscillator with software selectable frequency from 8 MHz to 125 KHz. It also offers a feature that allows external signals to wake it upfrom the sleep state.

If you want to explore the feature of this microcontroller, here is a set of complete circuit diagrams and test projects. Visit this for more details.

Thursday, April 8, 2010

Digital Clock/Date/Thermometer with PIC16F628/PIC16F84A and DS18S20/DS18B20

Here is a small adjustable clock/date with thermometer function based on PIC16F628 or PIC16F84 microchip and DS18S20 or DS18B20 temperature sensor. The hardware part is very simple because it only uses pic microcontroller, the DS18S20/DS18B20 sensor, 4x7 segments (common anode, something like KW4-301xxx Series), four 2N3906 transistors, some resistors.

Wednesday, April 7, 2010

PIC16F84A Tutorial Board

Source: http://www.electronics-lab.com/projects/mcu/001/index.html
The PIC16C84 was introduced in 1993 by Microchip and the first PIC microcontroller to feature a serial programming algorithm and EEPROM memory, both of which lend themselves to hobby use: only a simple and cheap programmer is required to program, erase and reprogram the chip. PIC16F84 is a flash version of PIC16C84.

Since then Microchip has released much advanced PIC microcontrollers but this is still very popular among hobbyists. One reason for this is that there are lots of resources available on it and some good books published on PIC16F84. If you are looking to learn PIC microcontrollers, this could be a good choice. You can make your own tutorial board and do experiments.
For details, visit this.

Tuesday, April 6, 2010

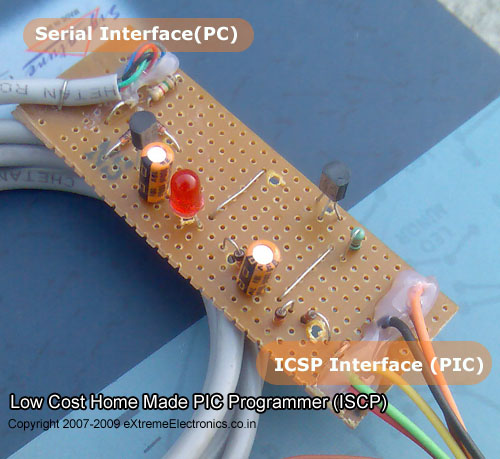
Make Your Own Serial PIC Programmer

If you are looking to make a PIC programmer by yourself, try this. This is a serial programmer (it may not work with USB to Serial converters) that uses two general purpose transistors and few resistors, diodes and capacitors. It is actually JDM based PIC programmer.
Source: http://extremeelectronics.co.in

For detail circuit diagram and description, visit this.

Monday, April 5, 2010

Learn PIC Programming in mikroC

If you are looking for online resources for learning PIC Programming in C, then you should probably check these two blogs:
1. http://pic16f628a.blogspot.com/
This blog starts with making your own PIC16F628A Development Board, and then teaches you basics of microcontroller interfacing by doing various experiments. The language of programming is C and the compiler used is the demo version of mikroC. The board has following features:
  • Access to all I/O pins through female header pins
  • 4 Push Buttons for Input
  • 4 LEDs for Output
  • An LCD Interface Port
  • A 4-digit Seven-Segment Display Interface
  • LCD Backlight Switch and Contrast Adjustment
  • ICSP Programming (Very Important)
2. http://picboard.blogspot.com/
This is another blog that teaches you about PIC12683, a 8-pin microcontroller from Microchip. The writer again starts with making his own development board, and uses mikroC for doing experiments. The board has following features:

1. A Regulated +5V power supply.
2. 3 Red LED outputs which can be connected to any GPIO pins using jumper wires.
3. An ON/OFF power supply switch.
4. A Green LED as a power ON indicator.
5. An 8-pin IC socket for PIC12F683 microcontroller.
6. Two potentiometers: one for providing Vref, and other for simulating analog input to ADC.
7. An ICSP header connector.
8. Two tactile switches for input operation.
9. A TTL to RS232 level shifter using a transistor circuit.
10. A piezo buzzer.
11. A DC motor with driving circuit.
12. Access to individual pins of PIC12F683 through female header pins.