Showing posts with label Best Electronic Projects. Show all posts

Monday, September 6, 2010

Capacitance Meter: PIC16F88 + mikroC

If you don't have a capacitance measurement on your multimeter, here's one that you can make by yourself. This capacitance meter is based on capacitor charging time. PIC16F88 is used to measure the voltage rise across the capacitor and finds the time required to get the known voltage across it. Then it does some math and finds the capacitance value.

 Source: http://www.pic_examples.byethost3.com/capacitance_meter.html
The firmware is written in mikroC. Read rest of the project.

Tuesday, August 31, 2010

Talking Clock

This is a very cool project. This digital clock speaks time in your voice. You have to first store audio samples in a SD card and the time is tracked by DS1307 RTC chip. The microcontroller used is Parallex Propeller running at 80MHz.


Popcorn Walkthrough from Gadget Gangster on Vimeo.


For functional details and others, visit link.

LCD Clock based on ATtiny2313

This LCD clock is based on ATtiny2313 microcontroller and displays time in 24 hour HH:MM:SS format. The accuracy is about +1 sec in 48 hours, and provides three tact switches for time setting.


For schematic and software, Visit Here.

Monday, August 30, 2010

Three Channel IR Remote Control based on PIC Microchip

This project is a 3-channel IR remote control for relays. It uses RC5 IR protocols.
Features :

* CPU PIC12F629 at 4MHz crystal for Tx/Rx
* 3 channel output relay
* The Tx use sleep mode for saving battery power
* Use Phillips RC5 protocal
* distance more than 7 m.
* Easy circuit to build and assembly

 Source: http://www.sixca.com/eng/articles/remote/index.html

On both the sides (Tx and Rx), it uses PIC12F629 microchips. For firmware and receiver part, visit here.

Sunday, August 29, 2010

Control Your Home Appliances using a DVD Remote Control

Are you looking for a device that can be used to control various household appliances (like fan, rice cooker, lights, etc) using your TV or DVD remote control? If yes, this is the project you are looking for. This is based on Atmega8 microcontroller. The microcontroller gets control commands from a DVD remote through IR link. Each time an appliance is turned ON/OFF, its status is stored in the internal EEPROM location so that it can be accessed later in case of power failure.


Source : http://arif-ece.blogspot.com/2010/07/remote-controlled-home-appliances_10.html

The firmware is written in AVR GCC. Read the full project.

Thursday, August 5, 2010

AT89C52 Based Contact-less Tachometer

Tachometer is a device that counts the revolutions per minute (RPM) of a rotating shaft. This projects describes how to make one that requires no contact with the rotating shaft. The microcontroller used is AT89C51 from Atmel, and the RPM value is displayed on a character LCD.

An IR Tx/Rx pair is used as a proximity sensor. The counted pluses will come from the proximity sensor, when it will detect any reflective element passing infront of it, and thus, will give an output pulse for each and every rotation of the shaft, as show in the picture below.


 For circuit diagram and programming, read rest of the project.

Wednesday, August 4, 2010

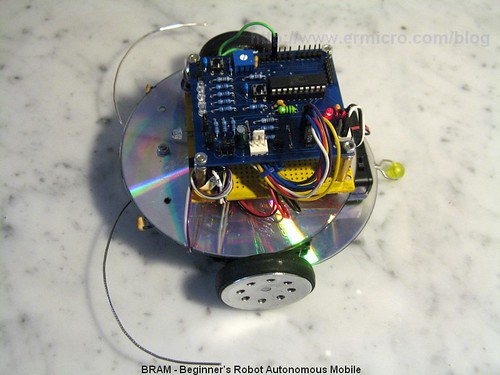
PIC-based Beginner’s Robot Autonomous Mobile (BRAM)

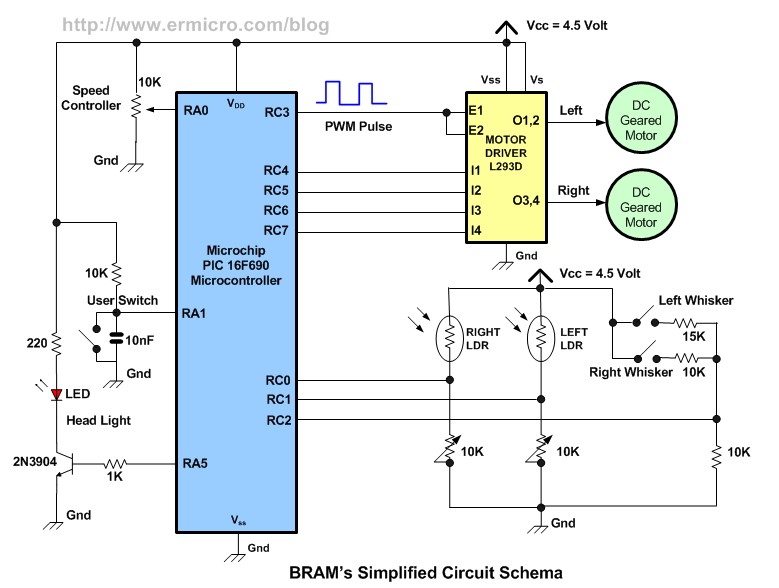
This tutorial shows how to build a Beginner’s Robot Autonomous Mobile, BRAM. It is designed to be easily built using some of the parts that you could easily found at home. The main controller for this robot is Microchip PIC16F690.


Source: http://www.ermicro.com/blog/?p=983

Two old CDs are used to build the chasis for the robot. The lower deck is use to hold the geared DC motor, battery power, caster and the robot’s bumper switches (whiskers) while the upper deck hold the robot’s motor driver, sensor’s board and the PIC16F690 circuit board.


The following are the list of BRAM’s construction material parts:
  • Two CD/DVDs for the chassis
  • Two geared DC motor rated 4.5 to 5 volt with the wheel or you could use the modified servo motor (it’s a servo motor without the electronics’s control board)
  • One 3 x 1.5 volt AA battery holder with on-off switch
  • One plastic bead (usually it use for the neck less) and one paper clip for the caster
  • Two microswitches and two paper clips for the whisker or bumpers sensor (not shown on the above picture).
  • Nuts, bolts, PCB (printed circuit board) holders, double tape to hold all of these parts together.
 Demo Video

Friday, July 30, 2010

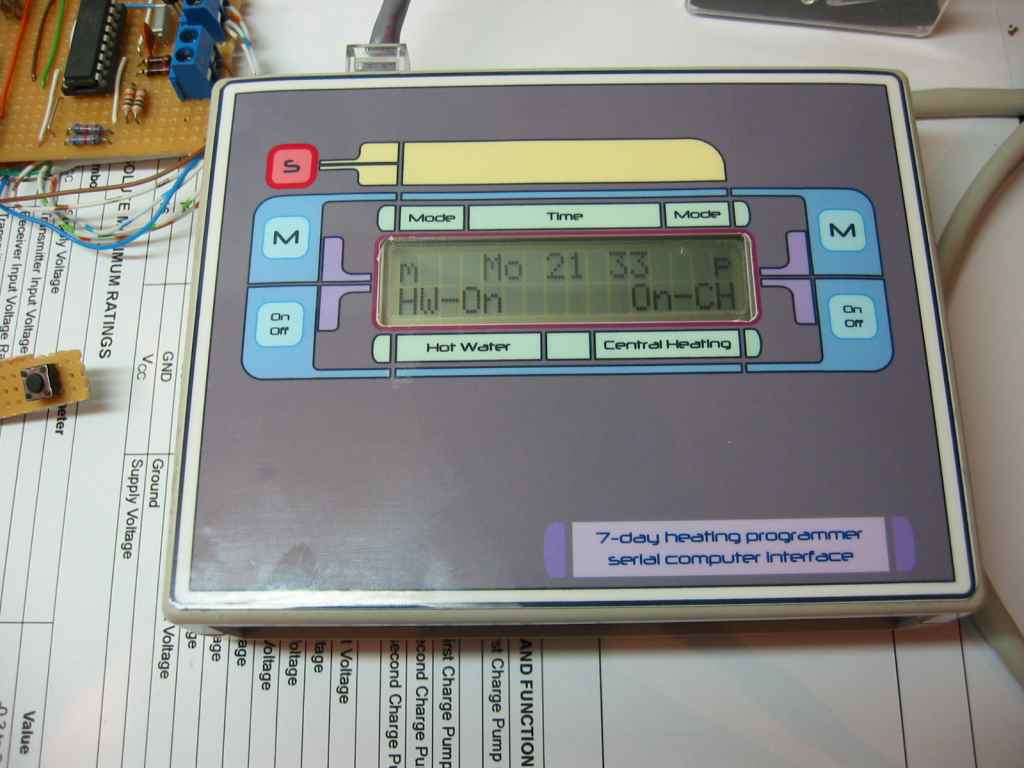
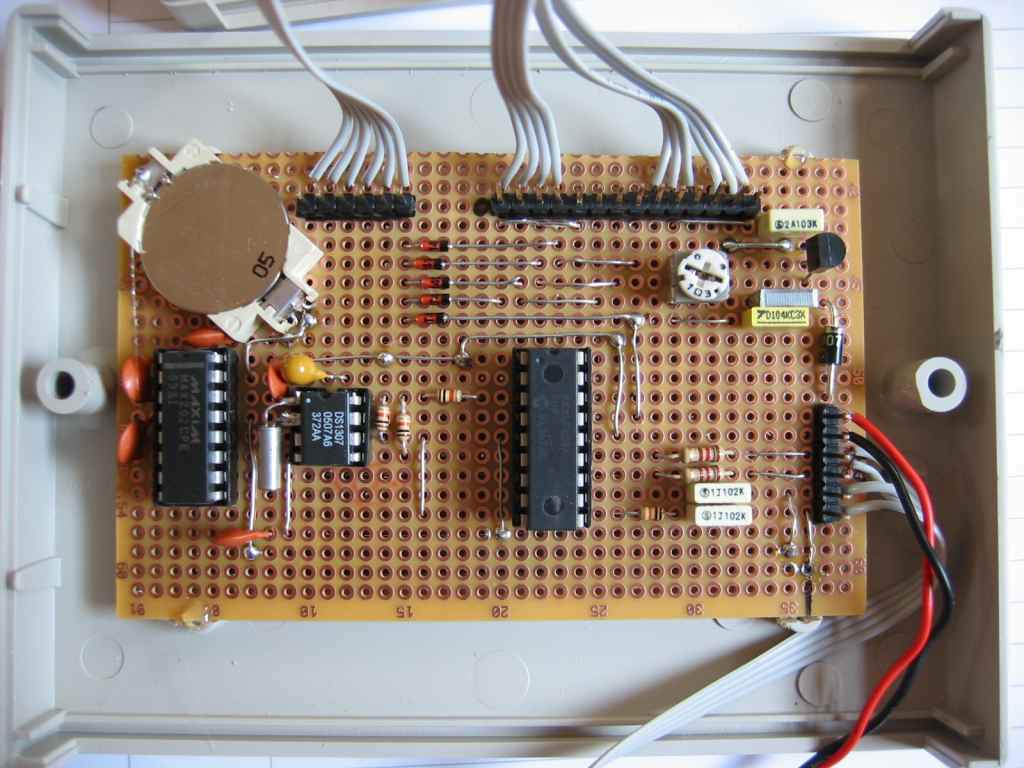
Versatile Central Heating Program Controller using PIC16F628A

This central heating program controller is designed to use with a heating boiler. The two relays control the supply of hot water and heating. It has a front panel switch control with a 16x2 LCD screen. It also provides a serial interface that allows to be operated remotely from a PC.

The programmer and boiler control relays are contained in separate units so that the relays can be located close to the boiler while the programmer itself can be located anywhere in the house using low voltage connections back to the relay unit. Besides you can also make a serial interface connection local to the programmer in which case you only need 4 wires for power and relay controls.
Source: http://picprojects.org.uk/projects/chc/chwkg.jpg
Features

* Independent control for heating and hot water.
* 10 flexible program entries.
* Programs can be set to operate Mon-Fri / Sat-Sun / Mon-Sun.
* Manual advance for water and heating
* Water and heating can be independently set to manual or programmed control.
* Operation and setup from front panel or remote serial CLI
* Battery backup for Real Time Clock (RTC), program settings and manual control.
* Programmer can be located remotely from boiler using low voltage signals over CAT5 or 6-core alarm cable.
* RS232 serial interface with command line interface allows full control and setting from any computer.
* Front panel control can be locked-out from serial CLI
* Based on Microchip PIC 16F628A microcontroller

Tuesday, July 27, 2010

Interface a SD Memory Card to ATmega8 with FAT32 Implementation

Some applications of microcontrollers like data loggers require a bulk of data storage and the internal EEPROM memory may not be sufficient. In such cases, use of SD memory card is a much cheaper solution.


This project demonstrates how to interface a SD card to ATmega8 microcontroller and transfer data (both in raw and FAT32 format) between the two. The data read from the SD card are transferred to a PC through RS232 connection and displayed on a Hyper-terminal window. Similarly, to write data to card, the data was fed through HyperTerminal, by typing some text.

For firmware and other details: SD/SDHC Card Interfacing with ATmega8

Monday, July 26, 2010

Ultrasonic Parking Aid

Parking your vehicle in a narrow space is always a risk. This parking aid project from Cornell university students will help you to prevent your Mercedes from getting scratched while parking in a tight space. This ultrasonic ParKontroller can sense how far you are away from the wall or a hidden object behind your car and warn you visually and audibly using LEDs and speaker respectively.

The students use the principles of Sound Navigation and Ranging (SONAR) technique in this design. This principle is used for finding the distance and direction of a remote object underwater by transmitting sound waves and detecting reflections from it. First, a series of short ultrasonic pulses are transmitted using a transducer that changes voltage into sound waves.

Source: http://instruct1.cit.cornell.edu/courses/ee476/FinalProjects/s2007/jjl49_mar97/jjl49_mar97/index_files/image022.jpg

This parking aid device can detect an object within a range of 40cm with accuracy of 1cm in the distance interval of 15 to 40cm. For more details, visit: Ultrasonic Parking Aid.

Thursday, July 22, 2010

LCD Thermometer using Atmega8 and LM35.

Atmega8 is a popular 8-bit microcontroller from ATMEL. It has 8KB self-programming Flash Program Memory, 1KB SRAM, 512 Byte EEPROM, 6 or 8 Channel 10-bit A/D-converter. Up to 16 MIPS throughput at 16 Mhz. 2.7 - 5.5 Volt operation. The LM35 of National Semiconductors that is used in this project is a precision centigrade temperature sensor, which has an analog output voltage. It has a range of -55ºC to +150ºC and a accuracy of ±0.5ºC . The output voltage is 10mV/ºC . The output voltage is converted by the AD convertor of the AT Mega8. The temperature is displayed on an LCD module.


For circuits and software, CLICK HERE.

Thursday, August 13, 2009

Final Year Project Title Guidance for Electronics Engineering Students (Part 2)

Continued from previous part.

11. An IC Tester : A universal IC tester is very difficult to make but one can build a digital IC tester for one or few groups/families of digital ICs, such as standard CMOS gate ICs, ADCs, Decoder/Encoder ICs, etc. The idea is there will be a ZIF socket to hold the test IC, an input interface to select the IC family/number, and a display device to show the result. Some sort of automatic detection of the test IC family can also be implemented.

12. Home Appliances Control Through PC : You can control and monitor the various household appliances using a microcontroller interfacing with a PC. The microcontroller will communicate with the PC to receive user inputs as well as to supply the status of the appliances to PC. The software running on a PC will record all the activities and send the report through email to a remote user. The user can also set timers for individual appliances to turn ON and OFF. This project can be slightly modified so as to use as a Electric Power Management in Hotels. The customers often don't care to turn OFF the fan and lights in the room while leaving. With this system, the lights and fans in hotel rooms can be switched OFF from the main counter while there is nobody in the rooms.

13. Microcontroller Based Frequency Meter : Make a frequency meter using a microcontroller that measures the input signal frequency and display on a LCD screen.

Tuesday, July 28, 2009

The Best PIC Microcontroller Projects on Web (Part 1)

In this section of my blog, I have planned to compile a list of some of the best PIC microcontroller based projects that are available online. Since there are many, they will be discussed here in a series of articles. This is the beginning. I hope this will help those students and hobbyists who really want to do something on PIC interfacing but getting hard time to find a good project to start with. These projects are really some of the best electronic projects based on PIC microcontroller interfacing. Meantime I also believe that there could be some others too that might have been overlooked by me. I would appreciate for your time and effort if you would like to provide the links of any other projects that you think should be listed here.

I have selected these projects out of hundreds on the basis of their completeness, explanation detail, and uniqueness.

1. An Alarm Clock Based on PIC16F84A

If you are looking to build a simple alarm clock based on a PIC 16F84A, this is a perfect choice. This clock counts seconds, minutes, hours and day of the week. The display portion consists of 4 seven segment LED displays, and the clock can be programmed with three push buttons. For the circuit diagram, program, and other details, CLICK HERE ....


2. PIC16F628 Based Frequency Counter


This is a very cool project based on PIC16F628, and I am pretty sure you will love to do it. The frequency range of this counter is 1Hz to 50MHz, and has automatic range switching capability. This project uses very minimum number of components and can be built on a single-sided general purpose proto-board. For more details, CLICK HERE ...


3. Digital Thermometer


This is another project based on PIC16F628, and a 1 wire digital thermometer IC DS1820. It uses 16x2 LCD screen for temperature display. It has a relay switch to control any system based on surrounding temperature. For details, CLICK HERE ...

4. A VGA Test Box

The goal of this project is to develop a VGA test equipment that is capable of generating VGA signals that could be fed to a monitor to display figures and text. The good thing about doing this project is it will give you a chance to learn about how CRT monitor works, as well as the importance of timing and synchronization in displaying output on a monitor screen. This uses PIC18F452 microcontroller with a 4MHz oscillator. For detail schematics and description, CLICK HERE...